This post may contain affiliate links. Please see our disclaimer for more info.
It was my kid’s first birthday back in February. I had family coming into town, and it was going to be a busy but fun event. I went down to the basement to grab some party items and found myself standing in 3 inches of water. It was a less than ideal situation. It turned out that my sump pump died likely a week or 2 before, and I didn’t notice until too late. We don’t use the basement too often in the winter since it’s chilly. This was a nice little eye opener of a system in my home that needs to be automated and more intelligent. Sensors and Home Assistant to the rescue!
Updates
Feb-2020: After using this setup for over a year – I’ve made a few tweaks to make the automation more robust including letting me know when there is a failure with providing power to the pump. Find more details in this post including the node red flow to download.
Sep-2021: HA changed how TP link attributes (watts, volts, etc.) are pulled in. They are now pulled in as individual sensors and making templates is no longer required | Added TP-link KP115 outlet links – HS110 is discontinued
Ingredients
- Smart outlets with energy monitoring
- Main sump pump
- Backup sump pump (optional, recommended)
- HA Components: binary_sensor, history_stats
- Later enhancement will include a water sensor – I’ll create a new post for this

Equipment
Depending on where you live and if you have a basement, you likely have a sump pump. The pump takes water collected on lower levels of the house and pumps the water to a remote location away from the house. I am using this [Amzn link] for my main pump as that’s the same model that was in my house when we bought it – the previous one lasted 15 yrs so I’m happy with the model. I also purchased this [Amzn Link] as a backup. It’s not nearly as powerful, but can suffice temporarily in the event that the main pump fails. Both pumps are triggered when enough water is present.
I’m using a TP-Link HS110 Smart Outlet for this project. However these outlets are discontinued and replaced with a newer, better form factor model the TP-Link KP115. Certain models of their smart outlet series are able to report on power consumption which is a requirement in order to create triggers for automation. Outlets that report energy consumption are a little more pricey but not bad – maybe $5 or so more than a standard smart outlet. Overall, I’ve been pleased with the TP-link outlets. Simple and does the job well. My main complaint is that they are large – you’ll likely need extension cords if you plan to use more than one in the same location (see pic above) – not an issue with the newer version though.
One consideration in choosing a smart outlet is to ensure it can handle the current draw of your pump. Electric motors can draw a lot of current. Check your pump’s specs and ensure the pump current draw doesn’t exceed what the outlet is rated for. Ideally, give yourself a buffer of a few amps to not over stress the relay within the outlet. The TP-Link KP115 outlets can handle up to 15 amps and my pump draws 10 amps so I’m in the clear!
One unintended discovery of this project was learning that my backup pump used more energy than the main pump even though the backup was idle.
Backup pump consuming more energy than the main pump? How does that make sense? Turns out that the backup pump uses a fair amount of electrical current to sense water (that triggers it on/off). The main pump uses a mechanical trigger which requires no additional energy to maintain. I tweaked my automation to leave the switch powering the backup pump off most of the time and occasionally turn on in an effort to reduce the unnecessary energy consumption. I would have had no idea about the unnecessary electrical spend unless I had energy monitoring outlets!
Integration
Setting up the TP-Link Outlets is a breeze. Download the TP-Link Kasa app to get started. Follow the instructions in the app – set the outlet in pairing mode, connect to it via your phones WiFi, enter WiFi credentials, and you’re set.
Getting the TP-Link Outlets integrated with HA is just as simple. Head to your settings UI in home assistant and add the TP-Link integration. No configuation.yaml editing needed unless you prefer to. More details in the Home Assistant docs here.
Now that we have the TP-Link Outlets integrated, we want to create some more sensors within home assistant to do the heavy lifting for us. We will be creating binary_sensors and history_stats sensors. I use binary_sensors a bunch, they are simple and do their job well either reporting ‘on’ or ‘off’ based on a set criteria which makes creating automations that much simpler. History_stats is an awesome sensor that I recently discovered that does a bunch of work behind the scenes for you. It takes a sensor as an input and reports basic statistics on the usage of that sensor. It can track time on/running, number of times turned on, and more. If you are looking for even more statistics, check out the statistics sensor that can report on things such as means and standard deviations.
Binary Sensor
We’ll be creating a template that will take into account the wattage being currently used from our smart outlets. To do this, we write the below in our configuration.yaml that reads the wattage and checks if the wattage is above a threshold that we set. In my case, 10 watts does the job. Once the threshold is reached, out binary sensor will change from off to on. I’ve created one of these for each of my pumps. See my other post here where I’ve done a similar setup.
# configuration.yaml

binary_sensor:
  - platform: template
    sensors:
      main_pump_status:
        friendly_name: 'Main Pump Status'
        value_template: >
          {{ states('sensor.main_pump_watts')|float > 10 }}

      backup_pump_status:
        friendly_name: 'Backup Pump Status'
        value_template: >
          {{ states('sensor.backup_pump_watts')|float > 10 }}
History Stats Sensor
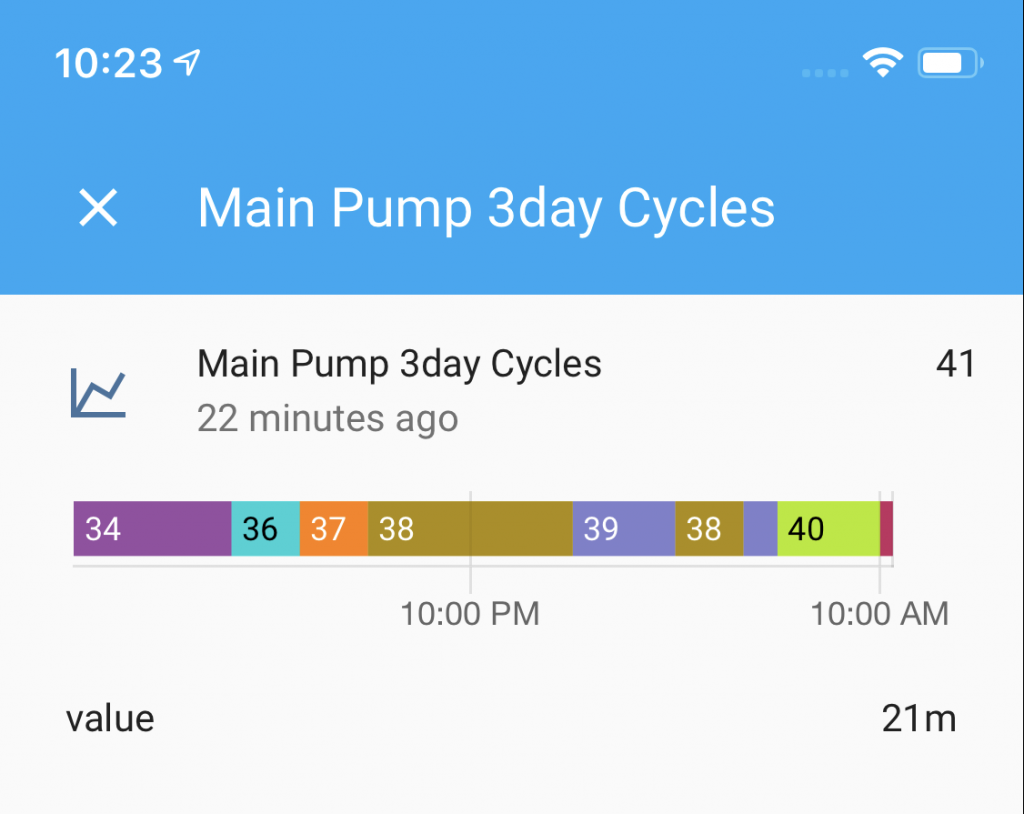
We’re going to use this sensor to ingest history data from the above binary sensors we just created. By using the count function, we’ll be seeing how many times this sensor turns on. I’ve created 3 of these sensors to track main pump 3 day run count, main pump 30 day count, and backup pump 1 day count. The 30 day run count isn’t used for any of the below automation, but it’s a nice metric to see how many times the main pump has ran in the last 30 days.
# configuration.yaml

sensor:
  - platform: history_stats
    name: Main Pump 3day Cycles
    entity_id: binary_sensor.main_pump_status
    state: 'on'
    type: count
    end: '{{ now().replace(minute=0).replace(second=0) }}'
    duration:
      days: 3

  - platform: history_stats
    name: Main Pump 30day Cycles
    entity_id: binary_sensor.main_pump_status
    state: 'on'
    type: count
    end: '{{ now().replace(minute=0).replace(second=0) }}'
    duration:
      days: 30

  - platform: history_stats
    name: Backup Pump 1day Cycles
    entity_id: binary_sensor.backup_pump_status
    state: 'on'
    type: count
    end: '{{ now().replace(minute=0).replace(second=0) }}'
    duration:
      days: 1
One call out for this sensor is depending on how you construct it, this will impact how often it updates. See here for some examples on time format. We’re taking the now() method and replacing hour, minute, and second with zeros meaning it will run once a day at 00:00:00. If we only replace min and sec, it will run every hour on the hour – this is what I used above. by using the replace() method, you can have the sensor update whenever you’d like. I had things updating daily, however that made the counts delayed and my automations wouldn’t trigger right.
Automation
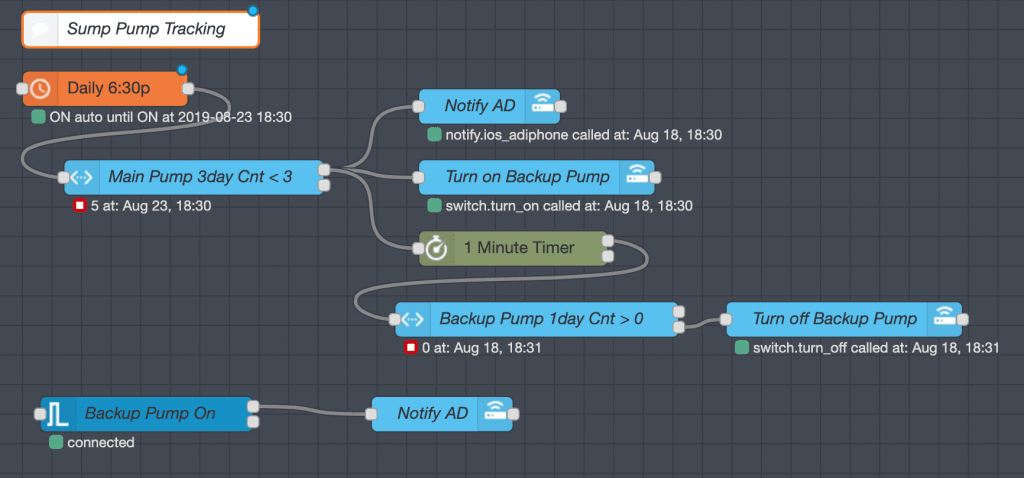
I had some fun with this part. Before going into the technical setup, let’s talk about the ‘business requirements’. In other words, what’s our goal with automating this? As a home owner with a sump pump, I want to be confident that my system is working properly and independently.
Just want the automation? Download the node red flow on this post where I’ve updated the automations.
One big caveat with these automations is that every home pump system is going to be different. Perhaps your sump pump normally runs 50x a day or perhaps it runs 3x a week. There are a variety of different conditions. You’ll need to figure out what the norm is for your system and tweak your automations accordingly. The below counts are based on my system, but I’ve found that this changes depending on the time of year. Regardless, a few false positives are better than false negatives in my book for this situation.
- Check daily if run count is low; if so turn on the backup pump
- If backup pump does not run, turn off outlet after a minute
- If backup pump does run, send notification. This means we have a problem with the main pump
- Check if main pump is running too much (not implemented in below pic of Node Red)
- If during rainy months, this could be perfectly normal. However it could be an indication of a leak where the pump is pumping the same water more than once resulting in a shorter pump life
- Be notified anytime the backup pump runs (it shouldn’t under normal conditions)
UPDATE Feb-2020: After using this setup for over a year – I’ve made a few tweaks to make the automation more robust including letting me know when there is a failure with providing power to the pump. Find more details in this post including the node red flow to download.

I’m pretty happy with this setup so far. I have a constant pulse on my system and know when action might be needed. I could be sump pump flooding free for the rest of my stay at this place now… 🙂


Pingback: Home Assistant ideas | Our Smart Home & Garden